Recently updated on November 11, 2022 at 06:47 am
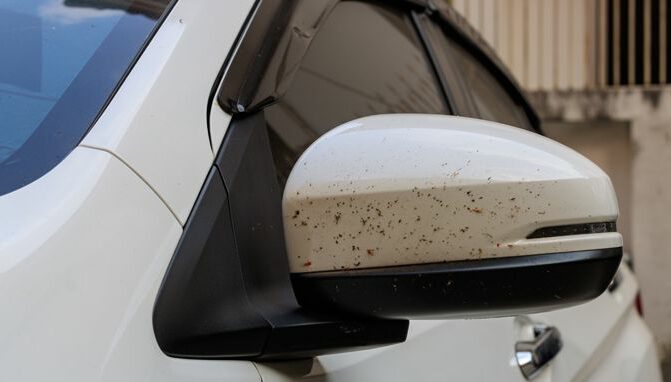
Deposits such as insects, tree sap and tar can damage the car paint and lead to unsightly spots and even to impaired visibility. Luckily, there are inexpensive removal substances available. In this article we tell you how to remove sticky deposits in just a few steps. You shouldn't wait too long so that the "juices" of dead insects don't burn into the car paint, because over time it will more and more difficultto eliminate the insects. So make sure your car regularly to get rid of insects. Especially if you frequently drive on country roads or highways, the vehicle's front, mirrors and windshield accumulate dead insects in heaps. In this case, clean your car not later than two days after returning home and avoid it to park the vehicle in the blazing sun.
Cleaning with WD-40!
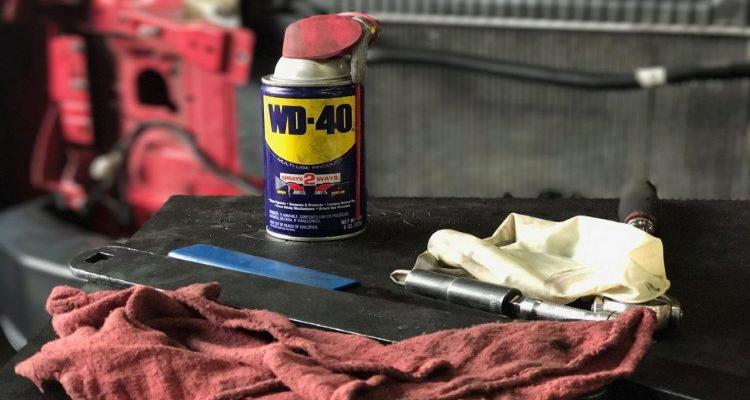
- Wear the oily substance WD-40 on the affected areas, which helps you to loosen the dead insects. It is best to apply the product with a microfiber cloth or by spraying it on and leave it alone about 10 minutes influence However, WD-40 may not applied to the windshield or windows as the oily substance is difficult to remove from there. If you don't have WD-40, you can use another insect and Tar stain remover to use. You can find a large selection in your local car parts store and of course on the Internet.
- Leave the WD-40 for a period of time act and then wipe the insects with a cloth and in a circular motion away. Don't rub too hard or you'll damage the paint. renounce Be sure to use a rough sponge or steel wool as these materials will scratch the paintwork.
- On Windshield the rough sponge, on the other hand, can be used without any problems.
- The method works well for insects, that are not yet completely dry. If the insects have already dried into the paint, then it may be more than a cleaning process necessary. Wear after the first step WD-40 again, let it sit for a few minutes and then clean your car erneut.
Windshield and window cleaning!
If the insects have settled on your window, you need a different cleaning solution. One is usually suitable for this Mixture of water and mild detergent. If you need a stronger cleaning agent, you should use special ones window cleaner buy at an auto parts store or supermarket. Spray your windshield and window surfaces with soapy water and leave for XNUMX minutes. Now you can wipe off the insects. For the most stubborn spots, use a scouring pad (kitchen dishwashing sponge). car wash: After removing the insects, wash your car thoroughly to completely remove the residues of the cleaning products used.
Removing resin
- Resin and similar particles should at least every few weeks removed, as they tend to form thick and hard layers if not removed regularly. If your car comes into frequent contact with resins, you should plan to deep clean it about every two weeks. Wash your car even more often in the summer, when the dirt is even more concentrated and greasy. In the long term, this saves you tedious detailed cleaning.
- Dip a cloth in Rubbing alcohol and apply it to the resin.
- Specific resin remover from your car parts dealer also work, of course. Leave the cloth on the resinous spot for at least ten minutes so that the alcohol can break it down and soften it.
- Now gently rub the softened resin with a soft microfiber cloth in a circular motion ab.
- If the resin not dissolves, give it time to soak again for 10-20 minutes. Repeat this soaking and rubbing procedure until the resin is gone from the car's surface. If the hard deposits are too stubborn, wear WD-40 .
- Use but no WD-40 for your discs.
- use no Scouring pad or other rough material for scouring the resin on the body. You risk detaching part of the paint with the resin.
Loosen stubborn resin deposits from windshields and windows
- Sometimes the resin has dried so much that it simply cannot be removed. In this case, use one box cutter blade or a top scraperto it careful to scrape off It's best to try using the top scraper with some rubbing alcohol in combination. Attention: This method is suitable notto remove resin from other components on the vehicle.
- Car wash: After removing the resin, you should clean your car to washto dissolve any residue. Small patches of resin could otherwise dry on other places and confront you with the same problem.
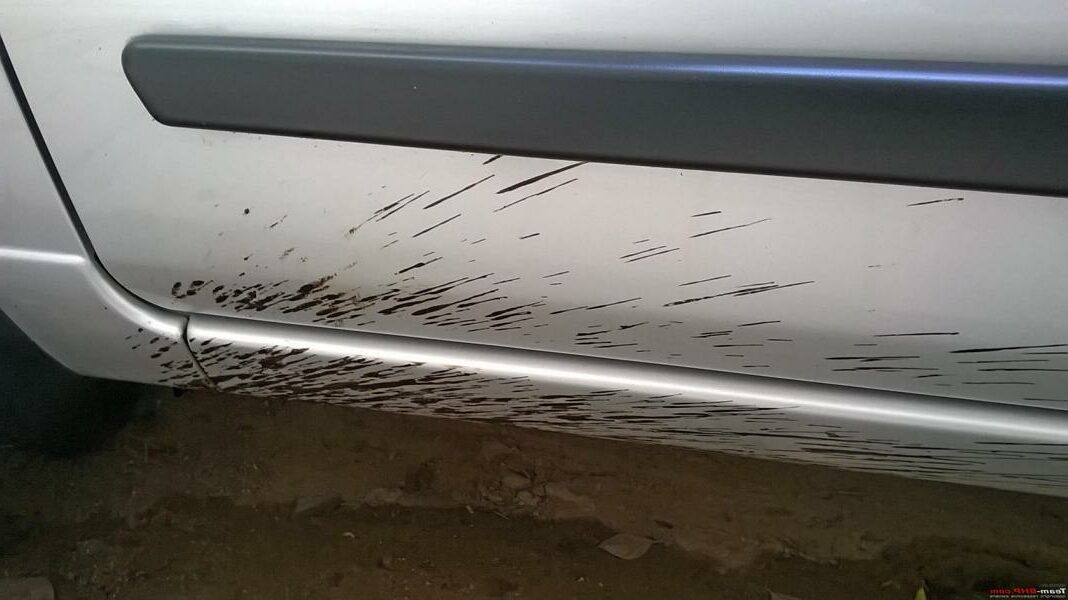
Tar removal
- Among the sticky substances can be tar the easiest remove them from your household by numerous means. Apply one of the following home remedies to the tar for a few minutes to loosen it: WD-40 (not suitable for windshield or other windows), margarine, commercial commercial tar remover, butter, peanut butter.
- Wipe away tar: Wipe off the dissolved tar with a soft cloth. If it's too stubborn, apply a little more of the product and let it sit for a few minutes. Then wipe again. Repeat this process until your car is tar free.
- As soon as the tar is gone, comes the car wash it's your turn. This allows the last residues to be washed off.
Tips: Don't wait until your car is completely covered with such special dirt, otherwise it will take you all day to remove it • Wax your car after cleaning • Work slowly and unhurriedly. Be patient and let the substances take effect • Also with Kerosene you can remove tar marks from the car by putting a small amount on the rag and treating the tar with it. Kerosene melts the tar away in a matter of seconds. Once the tar is loosened, wash and wax your car. Another good anti-tar agent is WD-40 . Ideally you use soft ones terry towels. You can remove as much fluff as possible by shaking it out vigorously • renounce on denatured alcohol, where the paint has chipped and the primer or metal is showing through as this could chip the paint • For large and dried 'globs' of sap, this suggestion works better than any harsh chemical on the market. Soak the area a little longer until the resin becomes a sticky substance. Then you can work on the spot • If necessary, you can also clean something grain alcohol use. But buy no Isopropyl alcohol from the pharmacy.
Warnings: use no denatured alcohol near an open flame or while smoking • Test the denatured alcohol on an inconspicuous area first to see if it will damage the paintwork • Alcohol will rarely damage paintwork unless left longer than five minutes • Use denatured alcohol in an area that is well ventilated, as the fumes can become intense
The following note is essential: For safety reasons, tuningblog recommends all repair, inspection and maintenance work exclusively to be carried out in a specialist workshop! Although our information is summarized to the best of our knowledge and belief, we cannot assume any liability for the content. All information is therefore "without guarantee".
Of course, that wasn't the end of it!
In this tuningblog category there are guides and instructions for common defects/repairs on the vehicle and for installing accessories/tuning parts. Our articles explain in a simple way common defects and the corresponding repairs, as well as explaining how the first signs of a defect become noticeable. In most cases, we also have initial clues to the repair instructions in our repair instructions approximate The costs of the pending repair are listed. The goal of our subcategory “Auto Repair Guide“ is to create a head start in knowledge for the next visit to the workshop with initial tips. This may save you from tedious troubleshooting and small things can perhaps be done directly on your own. The same applies, of course, to the installation of accessories/tuning parts. Here, too, we would like to help with the implementation with instructions and tips. There are many other posts on this as well. Below is an excerpt of the last and HERE there are all previous instructions:
|
Clean tinted car windows? That's how it's done!
|
What you have to consider regarding the liquid levels in the car!
|
How to clean the seat belt in the vehicle!
|


"tuningblog.eu" - we keep you up to date on the subject of autotuning and car styling with our tuning magazine and present you with the latest tuned vehicles from all over the world every day. It's best to subscribe to ours Feed and will automatically be informed as soon as there is something new about this post, and of course also to all other contributions.