Changing the exhaust – this is how self-assembly will definitely work. One of the biggest issues today is environmental protection. Car manufacturers are therefore constantly developing their exhaust systems so that the vehicles emit as few pollutants as possible into the environment. But depending on the vehicle type, the VSD (front silencer), the MSD (middle silencer) or the ESD (end silencer) also tend to rust through. As a Changing the exhaust from the catalytic converter works, let's use one VW Golf IV describe. With a little manual skill, you can change the exhaust pipe yourself, because it's not rocket science. In fact, changing the exhaust pipe is a doable job, especially for hobby mechanics.
So that the change is well organized, you should first have the following tools and accessories ready:
- Gloves
- Safety goggles
- Jack with jackstands
- rust remover
- Ratchet including matching nuts
- grease spray
- exhaust repair paste
Attention: Your own health always comes first and therefore you should not treat it lightly! The easiest way to carry out the exhaust system is to use a lifting platform. If you work with the jack, you should definitely use jackstands to jack the car up secure! First to Place under the vehicle after securing. To protect your hands and eyes from injuries and dirt, wear gloves and well-fitting safety goggles!
Changing the exhaust yourself - this is how it works!
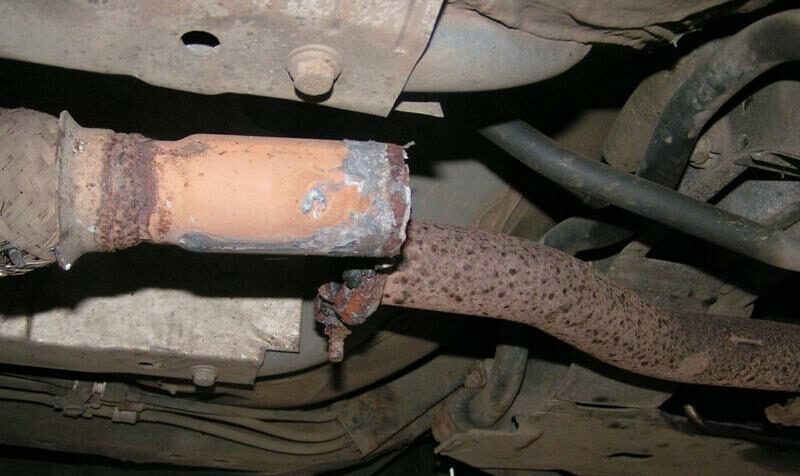
- Jack up of the vehicle safely and professionally. Next to the pulling the handbrake and the engaging the gear definitely bring the vehicle with you Jack stands to back up! This is done after jacking up the car Detaching the rear silencer. This one is only with two Rubbers fastened. (Rust remover in particular is a useful helper, which is why you should spray all nuts well with it)
- Now the rear silencer hangs down. remove now at the connection point with the middle silencer the clamps. The exhaust can then be easily pulled backwards over the rigid axle by turning it slightly (back and forth).
- Now it's time middle silencer further. First remove the retaining plate (if present) from the underbody. Then unscrew the clamp that connects the cat to the middle damper.
- In most cases, the nuts on the retaining plate are badly plagued by rust. Important to avoid losses, apply rust remover without being stingy.
- The nuts can now be loosened with a ratchet or an impact wrench. Important here: Put it on well because of the rust and unscrew it in one go. Then use a screwdriver to spread out the clamps and simply pull down the center silencer.
- Renew now Rubbers on the holding plate. To make it easier to loosen the nuts, pre-treat them with plenty of rust remover beforehand. The middle silencer can then be completely removed from the retaining plate.
- Spray the new retaining rubbers with something grease spray and then put it on the new center silencer.
- Then screw it to the retaining plate. It is best to renew on this occasion as well the rear straps.
Attention:
- For a correct installation of the retaining rubbers, the bent side must point to the outside of the vehicle. Since you are screwing directly into the body here, please screw on by hand first, as the screws must not tear out under any circumstances. Then using the Ratchet and sentimental screw tight.
- Also spray the rear retaining rubbers with something grease spray .
- Before installing the middle silencer, the rear silencer must first be brought into the correct position with a plug-in system. To do this, put it over the rigid axle with a bit of fiddling.
- The installation of the new middle silencer can now take place. Be sure to think about the clamp. Don't screw it tight just yet, but first put the retaining plate in the correct position and then screw it tight.
- Put the clamp on the connection between the middle and rear silencer in order to be able to connect them together again. To ensure that this area is 100 percent tight, it is advisable to apply a exhaust repair paste.
- Everything is pre-connected so far now. Now hang up the rear silencer again into the holding rubbers.
- Make final adjustments. It shouldn't hit anything when you shake the exhaust. If everything is in the green area, screw the clamps on the plug connection and the nuts on the retaining plate again fixed.
- Now you are done with the assembly. Start the engine and give it a quick gas while stationary. This is how you convince yourself whether the exhaust system is tight. If so, do one test drive.
Not that difficult, changing the exhaust system, right? With a little time and skill, you can replace your exhaust on your own.
The following note is essential: For safety reasons, tuningblog recommends all repair, inspection and maintenance work exclusively to be carried out in a specialist workshop! Although our information is summarized to the best of our knowledge and belief, we cannot assume any liability for the content. All information is therefore "without guarantee".
Of course, that wasn't the end of it!
In this tuningblog category there are guides and instructions for common defects/repairs on the vehicle and for installing accessories/tuning parts. Our articles explain in a simple way common defects and the corresponding repairs and they also explain how the first signs of a defect become noticeable. In most cases, we also have initial clues to the repair instructions in our repair instructions approximate costs listed. The goal of ourAuto Repair Guide“ is to create a head start in knowledge for the next visit to the workshop with initial tips. This may save you from tedious troubleshooting and you may even be able to do small things yourself. The same applies, of course, to the installation of accessories/tuning parts. Here, too, we would like to help with the implementation with instructions and tips. There are many other posts on this as well. Below is an excerpt of the last and HERE there are all previous instructions.