
With our contribution to the topic "Car windows tint! Costs, procedure and important information!' we explained in a way that was easy to understand Foiling the car windows takes place. But after a few years, depending on the quality and care, the tinted film may get more and more scratches, discolour, blister or has simply become too dark for the user. Then she has to go back removed, at best, without that it costs a fortune. In principle, it does not matter whether the film was attached to the windows of the car or the windows in the apartment. It must not for hours, with a razor blade or laboriously washing off the glue. The best way is to use one steam device. Another variation is to use the slide Ammonia to spray and then the windows cover with garbage bags. In combination with the sun, the ammonia dissolves the adhesive and the film can be removed.
Remove foil with steam!
First, wind down the window about 0,5 cm. The window should be opened far enough so that the upper edge of the pane can be seen and touched. Now open the door so that the inside of the taped window can be reached. Start with the panes in the windows and finally remove the film from the large rear window. The order is primarily for vehicles with a Rear window heating important so that you can practice and not start directly with the rear window and the sensitive heating wires.
Steam the window from both sides.
- Virtually any existing steam device can be used for this task. The nozzle should face the window 2,5 to 5 cm distance to have. First the outer side of the window is steamed. The window is then steamed from the inside. The movements should be long and sweeping. Preferably from top to bottom. The glass should be everywhere equal be heated. The adhesive dissolves when the pane is heated from the outside. In the case of the rear window or windows that are not easy to reach from the outside (in the apartment, for example), steaming is from the outside unnecessary. Instead of using a steamer, you can also use a hair dryer or a heat gun to loosen the glue. However, this will probably take more time and adhesive residue may remain. But beware: If the glass is heated too much, it can break! You should therefore be particularly careful with the hot air gun.
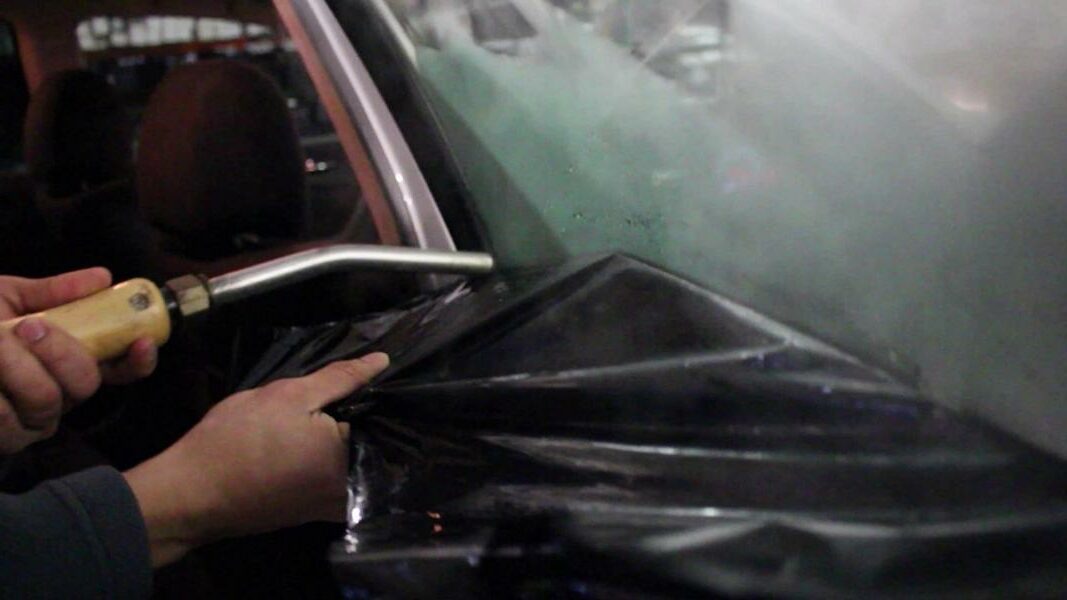
Using a razor blade, lift the foil at the edges.
- Gently trim the corner of the foil with the razor blade slide up. If the foil is loosened with the razor blade, it can be removed more easily. If the foil cannot be removed yet, it still has to be a little longer steamed/heated will. So steam the disc again and keep trying. If residues of the adhesive remain, the residue can be carefully removed with a razor blade. Alternatively, as the razor blade can also scratch the glass, a lemon-based cleaner should be used and the blade covered with a lubricant.
Continue steaming and slowly peel off the foil.
- The slide should slowly rotate at 180-degree angles from top to bottom subtracted from. Keep working with the steam as you peel it off, especially where the film is still sticking. Don't pull too hard, otherwise the foil will tear and the work will become more difficult. If the foil tears, simply find a new start with a razor blade. Warning: The hot steam can quickly cause burns and the razor blade is of course extremely sharp.
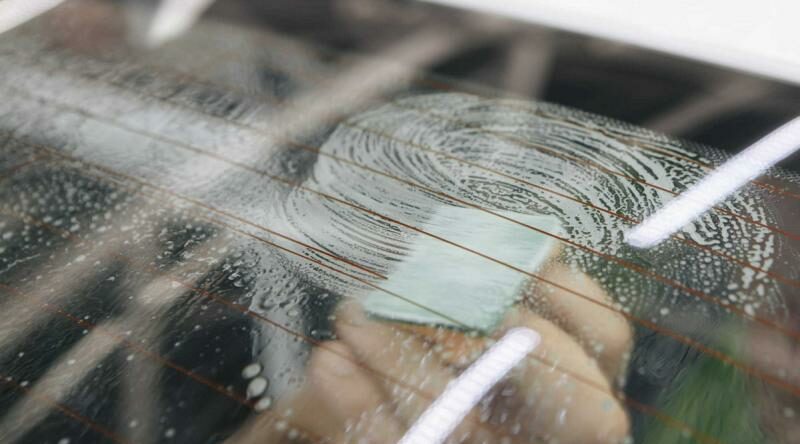
Normal household cleaners removed the adhesive residue.
- A spray bottle with a Mixture of water and household detergent fill in equal parts. Give this on the window and with a non-abrasive sponge scrub away. Then dry the glass with a paper towel. Wipe the door panels or window frame with a clean microfiber cloth to remove any remaining water. Then repeat this work on each additional tinted window. Tip: Always work slowly and calmly.
Tip: The residue can also be removed with an alcohol-based cleaning agent (e.g. spirit). To do this, put some of the liquid on a swab/cloth and wipe away the adhesive residue.
Steam for a few minutes so that the film can be removed from the rear window.
- If the foil is to be removed from the rear window, then you should, if possible, remove the window from Interiorbut also from Exterior spray with the steam jet. In contrast to the smaller side windows, you should wait several minutes (7-10 minutes). steam the rear window. Then carefully peel off the upper corners and the film at an angle of 180 degrees pull down slowly. It must be noted that the rear window usually has a sensitive rear window heater integrated, which of course should not be damaged. Tip: When the rear seats are folded down, the rear window is easier to reach (sedan). At least the headrests should be removed in any case.
Working with ammonia!
First you need to remove the interior trim door panels mask off. Plastic wrap is the best way to protect these parts from the ammonia. Be careful with newspaper, it is absorbent and would absorb and let the ammonia through. It is important that all electrical things such as switches or speakers are well covered. Tip: This way of removing the foil works best when the sun is shining, because then the heat from the sun can work with the ammonia to separate the adhesive.
Cut garbage bags to the shape of the windows.
- Place the garbage bag on the window and mark the edges with a marker trace. Then cut out the foil and take it apart. You get two foils per sack! One film is required for the inside and one for the outside. The film should be made for each window. If the outside cannot be reached, for example in the apartment, then only equip the inside with it.
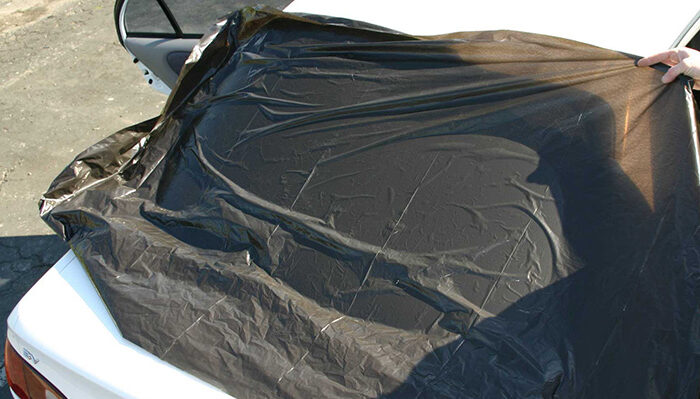
Now spray the windows with dishwater and place the garbage bags over them.
- It is three quarters using a spray bottle Water filled and then there is a splash Dish soap to. Then the windows from the outside spray and the garbage bag place on top. The water ensures that the film sticks to the window. the insides the discs are now sprayed with ammonia and ebenfalls covered with garbage bags. The garbage bag also sticks to the pane by itself due to the moisture. You must do this for all windows with window tinting. If the bin liner doesn't hold, use tape to secure as an alternative. And if there is no ammonia in the household, then simply use washing-up liquid or baby shampoo in combination with water. Attention: When working with ammonia, wear gloves and a respirator to protect skin and lungs. The sun now does the job of heating the glass. The heat allows the ammonia to dissolve the glue better. A hot, sunny day in midsummer is best for this activity. However, you should plan about 2 hours exposure time for the ammonia.
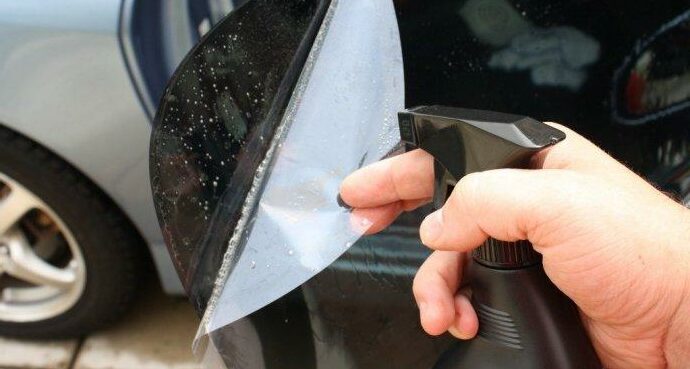
Now remove the bin liner and peel off the foil.
- Once the bin liner is off, use the razor blade to lift up one corner so that you can grab the foil with your fingers. Now slowly peel off the foil at an angle of 180 degrees. Proceed with calm and concentration so that the foil does not tear. If it tears anyway, simply lift a new corner and continue peeling.
Adhesive residues are removed with ammonia and steel wool.
- If the film is completely removed, adhesive residue may remain. But just the windows again Ammonia spray. Then with fine steel wool remove the glue residue. Then use some newspaper to wipe away the residue and the liquids. If the adhesive does not dissolve optimally, then with a razor blade help out There are large scraper blades that make the job easier. Be careful with the heating strips on the rear window, these are of course allowed in the campaign not be damaged.
Tip: Is the window tint just dirty and needs to be cleaned? All information can be found in our article "Clean tinted car windows? That's how it's done!“Read.
The following note is essential: For safety reasons, tuningblog recommends all repair, inspection and maintenance work exclusively to be carried out in a specialist workshop! Although our information is summarized to the best of our knowledge and belief, we cannot assume any liability for the content. All information is therefore "without guarantee".
Of course, that wasn't the end of it!
In this tuningblog category there are guides and instructions for common defects/repairs on the vehicle and for installing accessories/tuning parts. Our articles explain in a simple way common defects and the corresponding repairs, as well as explaining how the first signs of a defect become noticeable. In most cases, we also have initial clues to the repair instructions in our repair instructions approximate The costs of the pending repair are listed. The goal of our subcategory “Auto Repair Guide“ is to create a head start in knowledge for the next visit to the workshop with initial tips. This may save you from tedious troubleshooting and small things can perhaps be done directly on your own. The same applies, of course, to the installation of accessories/tuning parts. Here, too, we would like to help with the implementation with instructions and tips. There are many other posts on this as well. Below is an excerpt of the last and HERE there are all previous instructions:
|
Clean the fuel tank: how it's done!
|
How to clean the seat belt in the vehicle!
|
What you have to consider regarding the liquid levels in the car!
|


"tuningblog.eu" - we keep you up to date on the subject of autotuning and car styling with our tuning magazine and present you with the latest tuned vehicles from all over the world every day. It's best to subscribe to ours Feed and will automatically be informed as soon as there is something new about this post, and of course also to all other contributions.