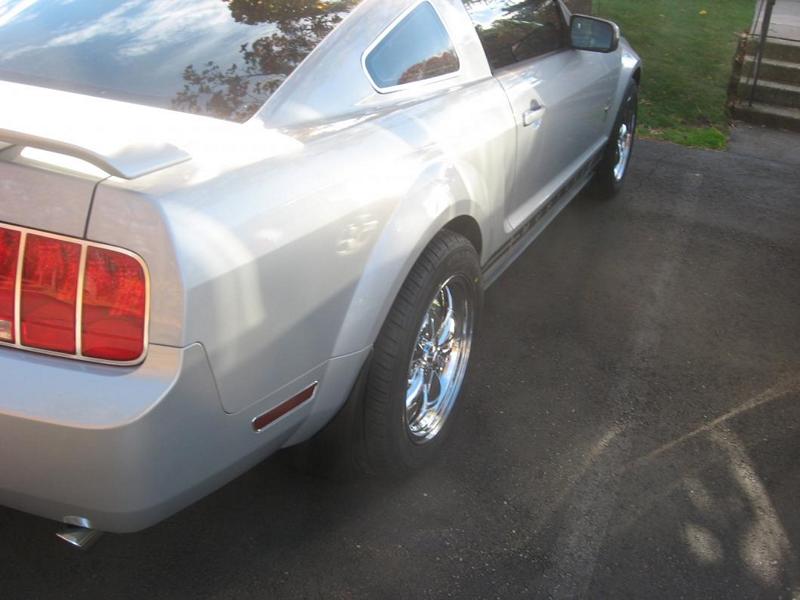
Correct installation of H&R TRAK+® wheel spacers is crucial to vehicle safety and performance. This article provides comprehensive instructions to help you install and maintain wheel spacers. Note that the wheel spacers exclusively are designed for use in road-legal vehicles. Start with the Careful cleaning of the centering and contact surface on the vehicle. This prevents dirt and rust from affecting the installation. Check the fit of the wheel spacers in the rim and on the axle contact surface. it is important, that no leeway exist and the wheel spacers are flush.
Torque information H&R wheel spacers
When assembling you may need to use existing ones Remove centering pins, retaining clips and brake disc mounting screws, if this is required according to the parts report or ABE. The wheel spacers are attached using the ones supplied screws, whereby the minimum screw-in depth varies depending on the thread type. This is a critical aspect tightening torque, which is carried out in accordance with the vehicle manufacturer's instructions for fastening standard wheels and the parts report for wheel spacers. The screw heads must not protrude from the wheel spacers and the freedom of movement of the screws to vehicle interior parts must be checked.
Checking the length of the stock wheel bolt
Another detail is checking the length of the Stock wheel bolt compared to the thickness of the wheel spacer. If the wheel bolt is too long, it must be shortened or replaced. After installing the wheel spacers, it is essential to check the clearance of the wheels and the necessary wheel cover. Note that the The use of steel rims is generally excluded from March 2011 unless otherwise stated in the parts report. After assembly and a driving distance of around 100 km, it is important to tighten all wheel bolts.
The installation of wheel spacers requires specialist knowledge and should therefore ideally be done in one carried out in a specialist workshop become. This particularly applies to vehicles with hybrid or electric drives. The Installation instructions, safety and care instructions must always be kept in the vehicle and observed every time the wheel is changed. If you have any questions or complaints, you should contact your dealer or assembly workshop.
Step-by-step instructions
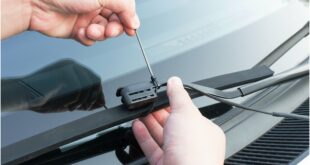
- Cleaning: Start by carefully cleaning the centering and contact surface on the vehicle with a wire brush to remove dirt and rust.
- Check fit: Place the wheel spacer in the rim and make sure that it rests against the inner chamfer and centering without any play.
- Installation: Place the wheel spacers on the center of the vehicle and check the fit again.
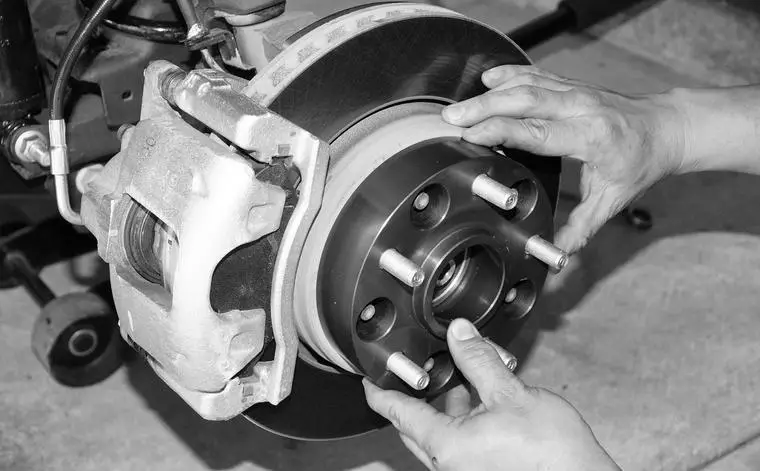
- Preparation of the vehicle: Remove any alignment pins, retaining clips and/or protruding brake disc mounting screws if necessary.
- Screw fastening: Attach the wheel spacers to the vehicle using the screws provided. Please note the minimum screw-in depth of the screws for different thread types.
- tightening torques: The current tightening torques for fastening the wheel spacers can be found in the vehicle manufacturer's information and the parts report.
- screw heads: Make sure the screw heads do not protrude from the wheel spacers.
- Freedom of movement test: After assembly, check the freedom of movement of the screws to vehicle interior parts such as ABS sensors and brake systems.
- Serienradschrauben: Check the length of the stock wheel bolt sticking out. It must be smaller than the thickness of the wheel spacers.
Fastening the wheel spacer
-
- Thread M12x1,25: Min. 8.0 turns (approx. 10 mm thread)
- Thread M12x1,5: Min. 6.5 turns (approx. 10 mm thread)
- Thread M12x1,75: Min. 6.5 turns (approx. 12 mm thread)
- Thread M14x1,25: Min. 9 turns (approx. 12 mm thread)
- Thread M14x1,5: Min. 7.5 turns (approx. 11 mm thread)
- Thread 1/2" UNF: Min. 8.0 turns (approx. 11 mm thread)
- Thread M15x1,25: Min. 8.0 turns (approx. 10 mm thread)
- Current tightening torques: according to vehicle manufacturer and parts certificate.
- Freedom of movement of screws: Checking after assembly; no interference with ABS sensors, brake systems etc.
- Length of the standard wheel bolt: Must be less than wheel spacer thickness; shorten or replace if necessary.
- Installation only in specialist workshops: Especially with hybrid/electric vehicles.
- Use of steel rims: Excluded if not approved in the parts report (from March 2011).
- Subsequent processing and withdrawal: Not permitted or only for unassembled new parts in the original packaging.
- Care instructions: Do not use aggressive cleaning agents; Check regularly for damage.
- Test drive and regular checks: Carry out after installation and every time you change a wheel.
Common torque specifications for wheel spacers
When installing wheel spacers, torque specifications are critical to ensure a safe and correct installation. Here are some general torque values to consider:
- For 7/16″ bolts a torque of 95 Nm empfohlen.
- For 12mm bolts you should 108 Nm apply.
- 1/2″ bolts typically require 115 Nm.
- For 14 mm bolts a torque of 129 Nm suggested.
- At 9/16″ bolts should 176 Nm should be used.
It is important to note that these values are as general guidelines and it is recommended to always follow the manufacturer's specific recommendations. If there are no specific instructions, as a rule of thumb, about half of the wheel bolt torque can be used for the wheel spacers. Similarly, if the wheel bolts are to be torqued to 100 ft-lbs (approximately 136 Nm), the wheel spacer bolts could be torqued to 50 ft-lbs (approximately 68 Nm).
For M12 bolts, a range of 110 – 130NM (reference value: 113NM or 83.3 ft-lb) is recommended. For M14 bolts it is 180 – 201NM (reference value: 181NM or 133.5 ft-lb) for steel rims and 140NM (103.5 ft-lb) for aluminum rims.
In summary: Compliance with the instructions ensures the safe functioning and admissibility of the H&R wheel spacers. A professional installation protects against potential personal injury and property damage and ensures that your vehicle sits optimally and safely on the road.
The following note is essential: For safety reasons, tuningblog recommends all repair, inspection and maintenance work exclusively to be carried out in a specialist workshop! Although our information is summarized to the best of our knowledge and belief, we cannot assume any liability for the content. All information is therefore "without guarantee".
That wasn't it yet!
In our Auto Repair Category you will find advice and instructions on common vehicle defects, repairs and the installation of accessories/tuning parts.
thematically relevant posts
|
How much does it cost to repair the windshield washer system? Our tips!
|
How can I change a car radiator hose?  |