The coolant flange is an important part of the vehicle's cooling system, which creates the connection between various cooling hoses and the engine block or cylinder head. A defective coolant flange can cause... loss of coolant and overheating of the engine. It is therefore important that if there are any signs of cracks, breaks or leaks, it is reported promptly is exchanged. Our little one Instructions acts as a general step-by-step guide to changing the coolant flange. However, please note that the exact procedure may vary from vehicle to vehicle and if in doubt you should always consult your vehicle's manual.
Change coolant flange
- Preparation:
- Make sure your vehicle is on a level surface and the engine is cold.
- Disconnect the batteryto eliminate any electrical risks.
- Provide access to the coolant flange:
- Remove any components that block access to the coolant flange, such as air filter housings or coolant hoses.
- Mark the position of the parts and hoses to be removed to ensure correct reassembly.
- Drain coolant:
- Open the radiator drain plug and leave that Coolant into a collection container. Close the screw again once the coolant has completely drained.
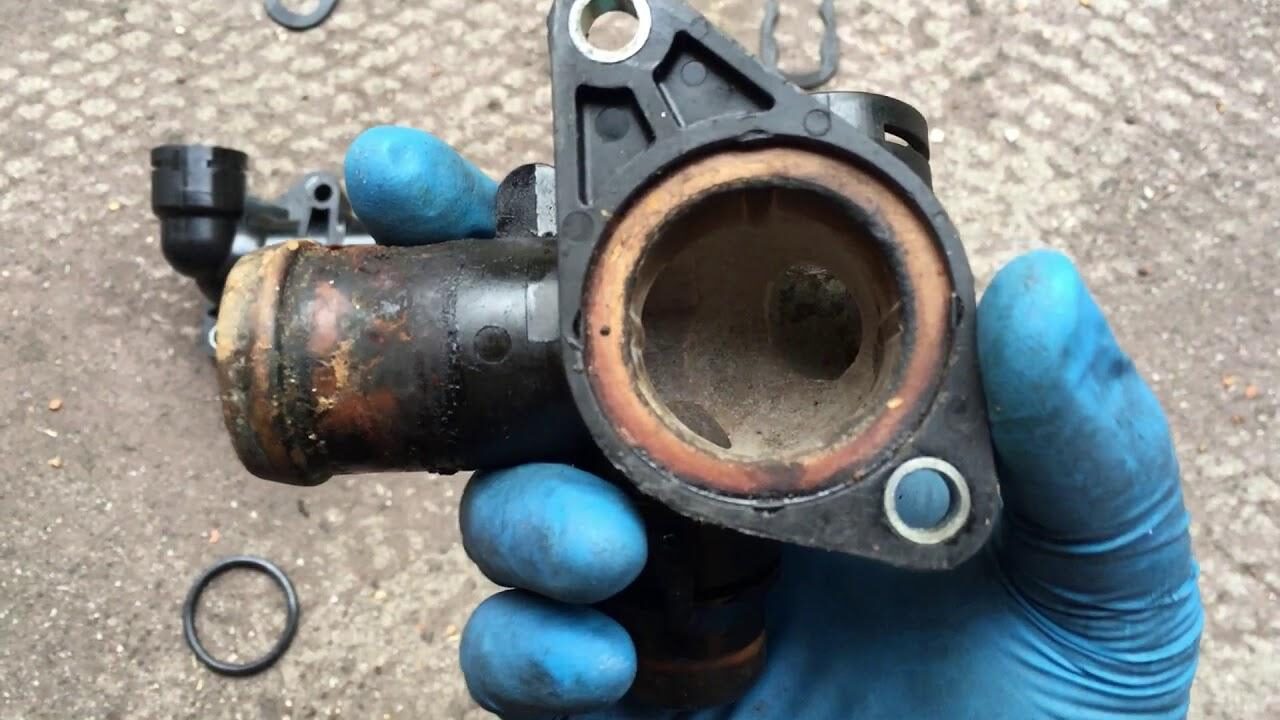
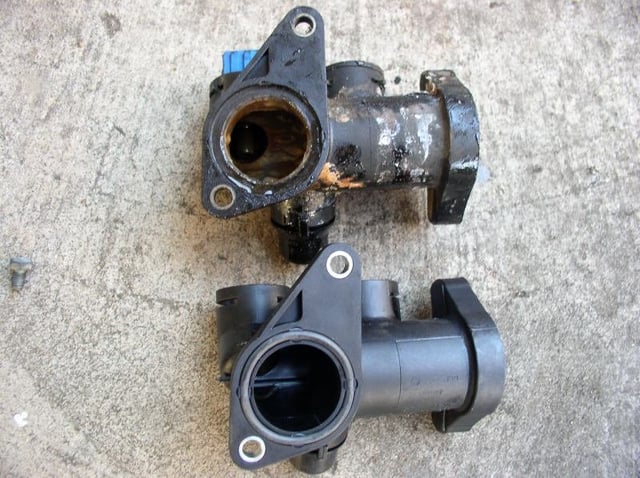
- Removal of the old coolant flange:
- Loosen the screws or clamps holding the coolant flange.
- Carefully remove the old flange. Make sure that no gasket residue remains in the engine block.
- Installing the new coolant flange:
- Thoroughly clean the contact surface on the engine block.
- Place the new gasket (if necessary) and new coolant flange.
- Attach the new flange with the screws or clamps, paying attention to the tightening torques specified by the manufacturer.
- Reconnecting the hoses and components:
- Reassemble all previously removed parts and hoses in reverse order.
- Check the connections for strength/tightness.
- Fill and bleed the cooling system:
- Refill the cooling system with fresh coolant.
- Start the engine and run it to bleed the system. Check the coolant level and add if necessary.
- Final review:
- After a test drive, check the coolant level again and check whether there are any leaks at the new coolant flange.
Important note: This guide is intended as a general guide. For specific information about your vehicle model, especially torque and special requirements, please read your vehicle manual or contact a professional. Safety always comes first and if you are unsure about any step, seek professional help.
FAQ: Coolant flange – useful information and details
- Where is the coolant flange located in the vehicle? The coolant flange, also called the water flange, is usually located left on the cylinder head (in the direction of travel) or right gearbox sidewhen you stand in front of the car. It has several hose connections and often includes the connector for the double temperature sensor G2+G62. Position may vary depending on model and engine.
- What exactly is a coolant flange? A coolant flange is a component in the cooling system. It's about a Connector between different coolant lines or hoses. The coolant flange ensures a safe and efficient flow of coolant through the engine's cooling system. It is used to connect various hoses and lines and at the same time accommodate certain sensors or measuring devices, such as the temperature sensor.

More information and tips
- How do you recognize a defective coolant flange? Signs of a defective coolant flange can be Leaks or loss of coolant be. Also Cracks or breaks on the flange itself are possible indicators. A defective coolant flange can result in inadequate cooling of the engine, which in turn can lead to serious engine damage.
- What to look for when changing? When changing, it is important to... Tightness of the connections to check and ensure that the new flange is installed correctly. It is advisable, everyone Replace seals and the screws with that correct torque to attract. After installing the new flange, check the cooling system for leaks and perform a leak if necessary Bleeding the cooling system .
- Change the coolant flange yourself? Replacing the coolant flange can be done by experienced DIY enthusiasts themselves. However, it is important to be aware of this necessary tools and basic knowledge in vehicle mechanics. If you are unsure or have more complex vehicles, we recommend contacting a specialist workshop.
- What role does the coolant flange play? The coolant flange plays an important role in the Regulation and maintenance of operating temperature of the motor. By connecting the various cooling hoses, it contributes to the efficient distribution of coolant in the engine and thus helps to avoid overheating.
Instructions for changing the VW Golf II
- vehicle models: Instructions valid for VW Golf II (19E, 1G1) in various model variants such as 1.6, 1.8, 1.8 Syncro, 1.8 GTI and others.
- Tools: Torque wrenches, sockets (#7, 10, 13), ratchet wrenches, fluid container, funnel, fender protectors.
Specific instructions:
- Open the hood: Provide access to the engine compartment.
- Open the coolant container: Preparation for coolant draining.
- Prepare liquid container: collecting the coolant.
- Loosen coolant hose: Use of socket wrenches and ratchet wrenches.
- Remove coolant flange: Be careful with hot coolant; Wear gloves.
- Dismantle the thermostat housing: Loosen fasteners.
- Remove thermostat: Carefully and without excessive force.
- Install new thermostat housing: Do not use excessive force.
- Attach coolant hose: Ensure safe assembly.
- Fill in coolant: Use only manufacturer-recommended coolant.
- Let the engine run: Removal of excess air in the system.
- Close the coolant container: after checking the coolant level.
Additional tips:
- Check coolant condition and thermostat: Follow the manufacturer's recommendations.
- Carry out work with the engine switched off: Safety measure.
- Pay attention to the correct torque: Use of a torque wrench recommended.
The following note is essential: For safety reasons, tuningblog recommends all repair, inspection and maintenance work exclusively to be carried out in a specialist workshop! Although our information is summarized to the best of our knowledge and belief, we cannot assume any liability for the content. All information is therefore "without guarantee".
That wasn't it yet!
In our Auto Repair Category you will find advice and instructions on common vehicle defects, repairs and the installation of accessories/tuning parts.
thematically relevant posts
|
The torque specifications for H&R wheel spacers!
|
How much does it cost to repair the windshield washer system? Our tips!  |